A man cave built around a sound system, a home theater screen, or a late-night poker table only works if the noise stays where you put it. The problem is that most man caves sit in basements, garages, or spare rooms that were never built with sound in mind.
Concrete floors, drywall, and hollow doors all let noise travel, and none of that requires a sledgehammer to fix. With a weekend, a few tools, and a modest budget, you can cut the sound leaking out of the room and clean up the echo inside it.
Why Your Man Cave Leaks Sound in the First Place
Sound escapes through gaps and travels through hard, flat surfaces. A door with a half-inch gap at the bottom acts like an open window for bass frequencies. Hollow-core doors, single-pane windows, and uninsulated vents all pass sound through with almost no resistance.
Inside the room, the same hard surfaces that let sound out also bounce it around once it’s in. Bare drywall, tile, concrete, and large windows all reflect sound waves instead of absorbing them. That’s why a man cave with a great speaker setup can still sound harsh or boomy: the problem isn’t the equipment, it’s the room reflecting too much of what the equipment puts out.
Two separate issues are at play here, and they need different fixes. Sealing gaps keeps sound from leaving the room. Adding soft, absorbent material inside the room keeps sound from bouncing around once it’s there. A budget plan has to hit both.
Sealing the Gaps: Doors, Windows, and Vents
Start with the door, because it’s usually the biggest leak. A door sweep installed along the bottom edge closes the gap where sound escapes most easily. These attach with screws or adhesive strips and take about ten minutes per door.
Weather-stripping around the door frame closes the smaller gaps along the sides and top. Foam or rubber strips press into the frame and seal when the door closes, the same way they’d block drafts in winter. For a bigger jump in isolation, a door draft stopper or an acoustic door seal kit adds a second layer of resistance without replacing the door itself.
Windows get the same treatment. Weather-stripping around the frame handles the gaps, and heavy curtains or a window insulation kit cut down on what passes through the glass itself. If the man cave has a window unit air conditioner, check the seal around it too; those gaps are often bigger than people expect.
Vents and ductwork are the gap most people forget. Sound travels through HVAC ducts far more easily than through a wall, because the duct is a straight, hollow path. A vent sound baffle, or even a simple acoustic foam liner inside the vent cover, reduces how much sound makes the trip. It won’t eliminate the leak, but it closes a gap that’s otherwise wide open.
None of this requires cutting into anything or calling a contractor. It’s the same category of fix as sealing a drafty door before winter, just aimed at sound instead of cold air.
Soft Surfaces That Actually Absorb Noise
Hard surfaces bounce sound. Soft ones absorb it. The fastest, cheapest way to cut echo in a man cave is to add soft material wherever there’s currently bare floor, wall, or ceiling.
A thick area rug over a hard floor makes an immediate, noticeable difference, especially in a basement with concrete underneath. The thicker the pile, the more sound it soaks up. If the budget allows for it, a rug pad underneath adds another layer of absorption and also helps with impact noise, like footsteps or a dropped remote.
Curtains do double duty. Heavy, lined curtains over windows block some sound from passing through the glass, and if hung along a bare wall, they absorb sound inside the room too. Blackout curtains, which many man caves already use for the home theater setup, happen to be good acoustic material as well.
Furniture itself counts as a soft surface. A couch, an armchair, even a bean bag chair all absorb sound that would otherwise bounce off a bare wall. This is one of the reasons a sparsely furnished room with concrete floors and drywall often sounds louder and harsher than a fully furnished one, even at the same volume.
Even wall hangings help a little. A bookshelf packed with books breaks up flat wall surface and adds irregular, absorbent material. It’s not a substitute for dedicated acoustic treatment, but it’s not nothing either, and it’s the kind of thing most man caves already have lying around.
Acoustic Panels vs DIY Alternatives: What’s Worth the Cost
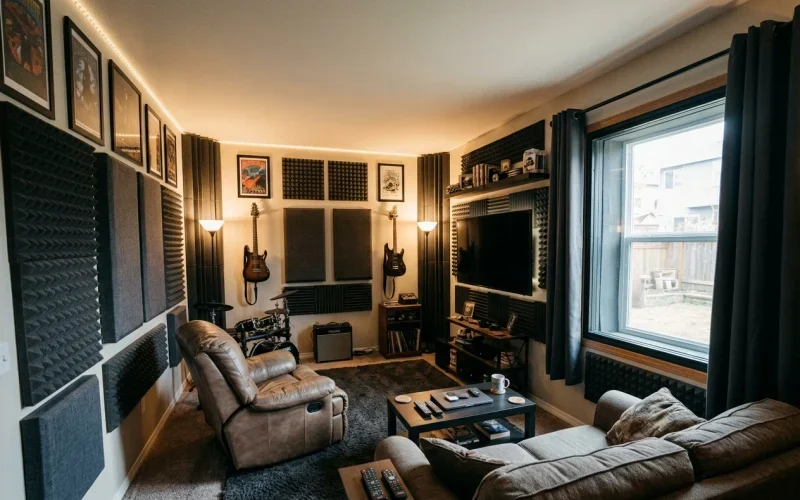
Foam acoustic panels are the most recognizable soundproofing product, and they do work, but they’re often misunderstood. Foam panels absorb mid and high frequencies well. They do very little against bass, and they do nothing to stop sound from leaving the room. Their job is to clean up echo and reflection inside the space, not to soundproof it from the outside.
A basic foam panel kit covering a few key spots, like the wall behind the TV or speakers and the wall directly opposite, can noticeably tighten up the sound of a home theater or stereo setup. You don’t need to cover every wall. Placing panels at the first reflection points, the spots where sound bounces directly between the speakers and the listening position, gets most of the benefit for a fraction of the cost of full coverage.
For a cheaper DIY route, moving blankets or thick furniture blankets hung on the wall do a surprisingly similar job to foam panels for absorbing mid-range sound. They’re not as visually clean, but they cost a fraction of the price per square foot and can be pinned up with basic hardware. Some man cave owners frame them to look more finished, stretching the blanket over a wood frame and wrapping it like a canvas.
Carpet remnants or old rugs mounted to the wall work the same way. If a carpet store has an end-of-roll piece or a remnant going cheap, it can be cut down and mounted as a wall panel. It won’t look like a studio, but it absorbs sound just as well as a store-bought panel at a lower cost.
The honest answer on what’s worth the money: a small number of real acoustic panels at the reflection points, combined with DIY blankets or rugs for the rest of the room, gets you most of the acoustic benefit without paying full price to cover every wall.
Furniture and Layout Tricks That Cut Echo
Where you put things matters almost as much as what you put in the room. A couch pushed flush against a bare wall does less good than one pulled a few inches off the wall, because the gap behind it breaks up direct sound reflection.
Bookshelves, especially ones that aren’t perfectly flat and packed tight, scatter sound rather than reflecting it cleanly back. Placing a bookshelf on the wall opposite your speakers or TV can noticeably cut down on flutter echo, that quick, metallic-sounding repeat you get in rooms with two parallel hard walls.
Speaker placement itself affects how much a room echoes. Speakers placed flush against a hard wall, or in a corner, tend to boost bass in a way that sounds boomy rather than clean. Pulling speakers out from the wall, even by a foot, often improves sound quality without spending a dollar on treatment.
If the man cave doubles as a space for a home bar, the same logic applies to that corner of the room. Bottles and glassware on open shelving reflect sound just like bare drywall does; a cabinet with doors, or a shelf backed with cork or fabric, cuts down on that reflection while still keeping the bar functional.
Mass Loaded Vinyl and Other Heavy-Duty Options Without Tearing Into Walls
Mass loaded vinyl, usually shortened to MLV, is a dense, flexible material used in professional soundproofing to block sound transmission through walls, floors, and ceilings. It’s heavy, limp, and works by adding mass to a surface rather than by absorbing sound the way foam does.
The good news for a budget man cave project is that MLV doesn’t have to go inside a wall to be useful. It can be hung on an existing wall like a heavy curtain, sandwiched between a rug and a rug pad on the floor, or draped over a door as an extra layer behind a curtain. None of these methods require opening up drywall or hiring anyone.
A common approach is hanging MLV directly on the wall behind drywall-mounted brackets or furring strips, then covering it with a fabric panel or tapestry so it doesn’t look like a sheet of rubber. It’s heavier to work with than foam, so it typically takes two people to hang a full sheet, but the installation itself is still a DIY job with basic tools.
MLV is more expensive per square foot than foam or blankets, so it makes the most sense used strategically. One wall, usually the one shared with a bedroom or a neighbor, often gets more benefit from a single sheet of MLV than the whole room would from an equivalent spend on foam panels. For a renter or a budget-conscious homeowner, that kind of targeted spend usually makes more sense than trying to cover every surface.
Quick Wins for Renters Who Can’t Modify the Room
Renters face a specific problem: most of the best soundproofing moves involve things you can’t do in a lease, like replacing a door or drilling into a wall. Fortunately, most of what’s covered above doesn’t require any of that.
Door sweeps, weatherstripping, and draft stoppers are all removable and leave no damage. Rugs, curtains, and furniture placement require no modification at all. Even MLV can be hung with removable hooks or draped over an existing curtain rod rather than mounted directly to a wall.
A few additional renter-friendly moves worth adding:
- Use a tension rod and heavy curtain over a closet or alcove instead of a permanent panel.
- Stack bookshelves or furniture against the wall shared with a neighbor, rather than against the thinnest interior wall.
- Use removable acoustic tiles with adhesive strips rated for rental walls, rather than screws.
- Keep a thick rug and rug pad combo as the single highest-impact, zero-damage upgrade for a concrete or hardwood floor.
None of these require a contractor, a lease amendment, or a security deposit risk. They’re the same tools a homeowner would use, just applied in a way that packs up and moves with you.
A man cave doesn’t need a full renovation to sound better and leak less noise. Seal the gaps at the door, window, and vents first, since that’s where the easiest wins are. Add soft surfaces and rearrange furniture to cut the echo inside the room. Then, if the budget allows, add a few real acoustic panels or a strategic sheet of mass loaded vinyl where it matters most. Each step is a weekend project, not a remodel, and together they add up to a room that sounds the way it was supposed to all along.